This site uses cookies to improve your experience. To help us insure we adhere to various privacy regulations, please select your country/region of residence. If you do not select a country, we will assume you are from the United States. Select your Cookie Settings or view our Privacy Policy and Terms of Use.
Cookie Settings
Cookies and similar technologies are used on this website for proper function of the website, for tracking performance analytics and for marketing purposes. We and some of our third-party providers may use cookie data for various purposes. Please review the cookie settings below and choose your preference.
Used for the proper function of the website
Used for monitoring website traffic and interactions
Cookie Settings
Cookies and similar technologies are used on this website for proper function of the website, for tracking performance analytics and for marketing purposes. We and some of our third-party providers may use cookie data for various purposes. Please review the cookie settings below and choose your preference.
Strictly Necessary: Used for the proper function of the website
Performance/Analytics: Used for monitoring website traffic and interactions
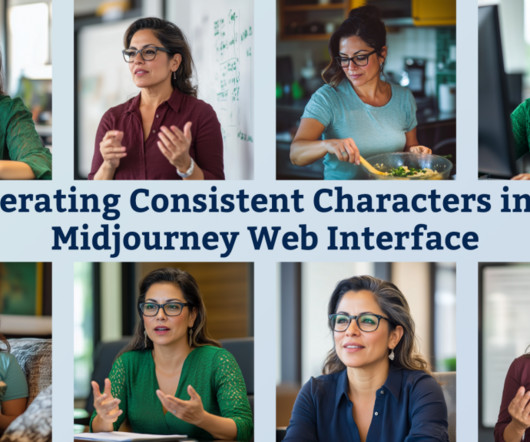
Click any image in this post to expand it. Generate the initial character reference image To get started, you need an initial reference image for your character. If you want any colors or objects in the background, include those here too. If you want any colors or objects in the background, include those here too.
I share these links about once a month here on my blog. I’m experimenting with AI image tools to create images for my blog posts. You can also export images as SVGs, which means you could edit the images to mix and match elements of a couple of different sets of images. Currently in closed beta.
This is part 4 in a series about how to become an instructional designer. The IconLogic blog has tips on Captivate, Storyline, Camtasia, RoboHelp, and more. The IconLogic blog has tips on Captivate, Storyline, Camtasia, RoboHelp, and more. This blog has helped me troubleshoot problems in a tool on multiple occasions.
Best AI Tools for Creating Training Materials in Corporate Learning GyrusAim LMS GyrusAim LMS - Artificial intelligence (AI) is revolutionizing how companies develop training materials, providing a faster, more efficient way to create engaging content.
Knowing what you need from an eLearning authoring tool can be hard, especially when there are so many options on the market. gomo’s new ebook aims to save you time and hassle by identifying 12 must-have authoring tool features.
I share these links about once a month here on my blog. If you’re interested in AI images, be sure to try out the “ Real or Fake ” image quiz. The image above was generated in Midjourney, with text added in Affinity Designer. AI tools and reflections Can you detect AI images? Real or Fake?
Import 3600 images and create a seamless virtual reality project. Automatic Chroma Key Effects: You don’t need to be a green screen technology expert to remove the background. With this new feature you can personalize your videos with few clicks and add images or videos as background.
We’ve talked a lot on this blog about the importance of good instructional design , which often focuses on how educators create course content. However, a key aspect of good instructional design is how that material is presented, visually. The ease with which a learner understand information is called “processing fluency.”
It makes sense: if you want to influence brains with new knowledge, it helps to know how brains function best while learning. It makes sense: if you want to influence brains with new knowledge, it helps to know how brains function best while learning. Eric is an Instructional Designer at the Federal Reserve Bank of Minneapolis.
The inclusive practice of removing barriers and making learning content usable and accessible to everyone. Alternative text describing the content of an image on a website or in an eLearning course. Technology which overlays digital information such as text labels, images and sounds onto the real-world environment. Andragogy.
Likewise, if your learners can’t see your content clearly, they can’t learn from it. Warm colors naturally “pop,” while cool colors tend to fade into the background. You can use other colors but make sure there’s enough contrast between the content and the background that nothing gets lost.
Back to Blog Employee Training & Development 18 Best Instructional Design Software in 2023 April 26, 2023 Disha Gupta With an increasingly competitive business landscape and accelerated technology adoption, it has become critical for organizations to focus on revamping and or realigning their instructional design process.
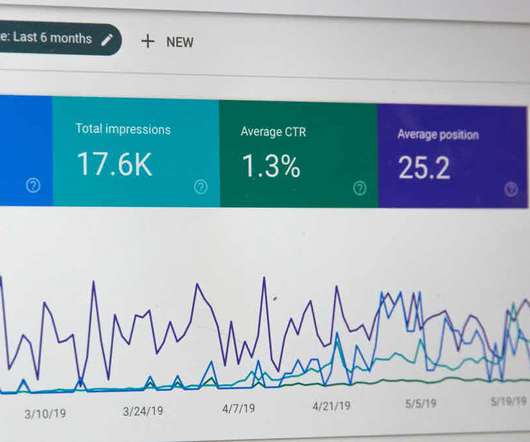
Here’s how to avoid some of the worst errors. Following a bad strategy with SEO can be particularly frustrating, as some practices can undermine your efforts and even lead to penalties from Google. Keyword stuffing is the oldest mistake in the book, but that doesn’t stop some people from still following the practice.
I demonstrated how adding an object to a Main Master Slide instantly adds that object to all of the Content Master Slides and the Filmstrip slides. and short of deleting the object from the Main Master Slide, there was nothing you could do about it. what if you've merged an object into the background of the Main Master Slide?
I have both used Photoshop for years to help us create images for training courses, websites, blog posts, and social media. Web-based graphic creators allow you to get images created faster by letting their server take care of the heavy lifting. It has recently become one of my go-to tools in my graphic design toolbox.
Content Aware Fill is a new technique that seamlessly fills a selection with similar image content nearby. Here's how it works: Open an image and make a rough selection. Notice that this selection includes some of the background. Choose Edit > Fill and from the Use drop-down menu, select Content-Aware.
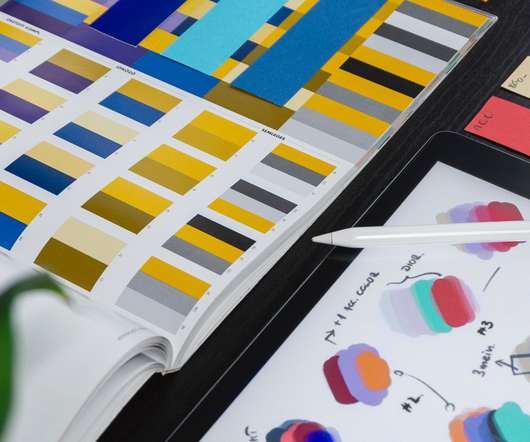
Readability is all about how well text can be read and understood, and it can be thought of as having two equally important sides: contextual and visual. Readability is all about how well text can be read and understood, and it can be thought of as having two equally important sides: contextual and visual. What is readability?
Because their revenue came from collecting a percentage of any sale that came through their own advertising, and because they had no review panel for ensuring the content they were advertising hadn’t been stolen, they were making money off referrals to stolen courses that had been posted to their platform.
Image & Video Manager. An eLearning authoring tool is a type of software to create digital content such as video, images, online courses, online tests, audio, and games for training purposes. Corporate eLearning has grown by an impressive 900% in the last 16 years. Let’s dig in. 10 Best eLearning Authoring Tools Why Is It Best?
The images all had different background colors, and I needed them to all have a uniform look. You have a logo, icon, or other image that you’re trying to design with, but you need to remove the background of the image. With Snagit, it only takes a few steps to quickly remove the backgroundfrom your image.
She was asked to remove the logo but could not. My first thought was to tell her to remove it from the master slides. However, she had already tried this and the logo appeared to be part of the actual background, even on the master slide. If the background had been solid, this would have been an easy fix.
by Kevin Siegel If you've spent time working with the Microsoft Office Suite, you can appreciate how Microsoft provides free images that can be added to a slide with just a few clicks of the mouse. I've always felt that the lack of free quality images was a major shortcoming within Captivate.
CourseArc Unveils AI Tool to Assist Visually Impaired Users As we explored in our “The Future of Online Learning is AI” blog post, the advancements in artificial intelligence (AI) technology has brought forth many new and exciting uses, especially for education. Image Insights is free to anyone and everyone who has a ChatGPT account.
Your plan needs to adapt, so you're thinking you'll simply duplicate the image a few times and then make each copy a bit more transparent than the previous one. The problem is—how? Here’s how to get from Point A to Point B, including an extra bit to accommodate if your photo has a background you’d like removed.
Start by selecting the clip art image, ungrouping it, and making the customizations you need. Start by selecting the clip art image, ungrouping it, and making the customizations you need. I also like to save the new image as a.png. Create Characters by Pulling Them Out of Stock Images. But you still have some flexibility.
Have you ever had a great photo except for that one annoyance in the background? Snagit can help you remove people, buildings, etc. from your images so you can focus on the area that is most important. Here is the same image after it has been retouched using Snagit 11. This video shows you how.
And of course a lot of the negativity surrounding PowerPoint comes not from the tool, but instead from sitting through tedious PowerPoint-driven lectures and presentations. PowerPoint Tip 1: Step Away from the PowerPoint Template. Put the bullet points down and step away from the template. Change the stacking order.
The images all had different background colors, and I needed them to all have a uniform look. You have a logo, icon, or other images that you’re trying to design with, but you need to remove the background of the image. With Snagit, it only takes a few steps to quickly remove the backgroundfrom your image.
Create a click and zoom effect to view images. Lighting effects from the award winning guru course. Production tip: how to view in slide show and edit the slide at the same time. Hide and reveal background fill and an alternative example using T agxedo. Use PowerPoint as an image editor. Snapshot focus effect.
eLearning Art provides royalty free stock photos, images, and other assets to help you create some cool stuff in your own authoring tools. eLearning Art provides royalty free stock photos, images, and other assets to help you create some cool stuff in your own authoring tools. Zombie Office View more presentations from cammybean. (I’ve
During the first day of my Adobe Captivate Beginner class , attendees learn how to import and work with both images and videos. During the video portion of the class, we import a Flash Video (flv) which students love because without the background color in the video, it's possible to include an animated guide throughout a lesson.
Your plan needs to adapt, so you're thinking you'll simply duplicate the image a few times and then make each copy a bit more transparent than the previous one. The problem is—how? Here’s how to get from Point A to Point B, including an extra bit to accommodate if your photo has a background you’d like removed.
In this tutorial I show you how to use Snagit to create a graphic with circle holes that can be used for video placement within Camtasia Studio. About the BackgroundImage with the Circle Holes. I wanted the backgroundimage with the circle holes to have the same colors, look, and feel as the videos to be placed in it.
Be sure to include how the talent will enter and exit the screen and what non-verbal gestures should be performed. The lights should be positioned so the talent is evenly lit and the solid green background is free from any shadows and also lit evenly. by John Gillmore and Bucky Dodd.
Image masking allows you to create unusual and unique edge effects for your photographs and other graphics. You can also use these images in Camtasia Studio to add masking effects to your videos (see a sample video here.). For this tutorial you will use a black and white geometric pattern image. Close the image in Snagit Editor.
In a previous blog, we explained cognitive load theory and looked at ways to identify if cognitive overload is a problem in your existing e-learning courses. In this blog, we will look at how to prevent cognitive overload from occurring in the first place through e-learning design and strategy. Focus on the Topic.
In this tutorial I show you how to use Snagit to create a graphic with circle holes that can be used for video placement within Camtasia Studio. About the BackgroundImage with the Circle Holes. I wanted the backgroundimage with the circle holes to have the same colors, look, and feel as the videos to be placed in it.
The default startup screen is a bit plain-looking (it's nothing more than a gray background and a play button). I bet you’re wondering why this screen exists, where it came from, and if there’s anything you can do to control it. . From the Category list at the left, select Start and End. .
I just returned from the Training 2012 Conference in Atlanta where I presented on some PowerPoint tips and tricks. In Atlanta I was sharing how PowerPoint makes a good image editor. After the session, someone asked about this video where you learn to create a stickout effect that lets the image stick outside the box.
5 Free Desktop Image Editors. 5 Free Online Image Editors. Let’s review a few of the common image editing tasks. How to RemoveBackgrounds. PowerPoint 2010 comes with a backgroundremoval feature which makes it really easy. Select your image and click on RemoveBackground.
In this blog, I am going to introduce you to all the aspects of a skill assessment test like-. In this blog, I am going to introduce you to all the aspects of a skill assessment test like-. How does it benefit recruiters and employers? How to create a skill assessment test. How Does It Benefit Recruiters and Employers?
It is a post-production effect that allows video editors to replace backgrounds and insert footage or images into their scenes. In this post we’re breaking down how to use green software for beginners. You’ll get faster every time you do it, learn how to get started. The first time is always the longest. Marketing Videos.
Below I’ll walk you through how to do this using my favorite screen capture tool, Snagit. Don’t start from scratch. If you’re not certain how to capture an entire webpage, including the parts that require scrolling, check out our Scrolling Capture tutorial. You don’t have to be a professional designer to mock up websites.
Today I am going to cover five ways to use PowerPoint as an image editor. This is great for quick image editing or for those who don’t have other image editors on hand. Save PowerPoint Content as an Image. I like to save as a.PNG so that the transparent areas of the image are still transparent.
We organize all of the trending information in your field so you don't have to. Join 59,000+ users and stay up to date on the latest articles your peers are reading.
You know about us, now we want to get to know you!
Let's personalize your content
Let's get even more personalized
We recognize your account from another site in our network, please click 'Send Email' below to continue with verifying your account and setting a password.


Let's personalize your content